Saturday 10 November 2012

Getting sideways.

  I have finally been earning enough money to start spending a little on the Jag. I bought some great flux core wire, it puts the CIG junk to shame. Beautiful spatter free welds and easy slag removal.
Anyway, I strapped the body down to the frame and lifted it with my engine hoist a couple of weeks ago, it's made working on the underbody so easy!


I've been tidying up the weld areas around the edges of the new floors and patches to be welded from underneath. This gives me double welded floor panel seams all round, overkill maybe, but allows for any less than perfect welds and looks much neater.


The floors are finished with now, have applied my favourite primer and then seam sealer once that is well dried.

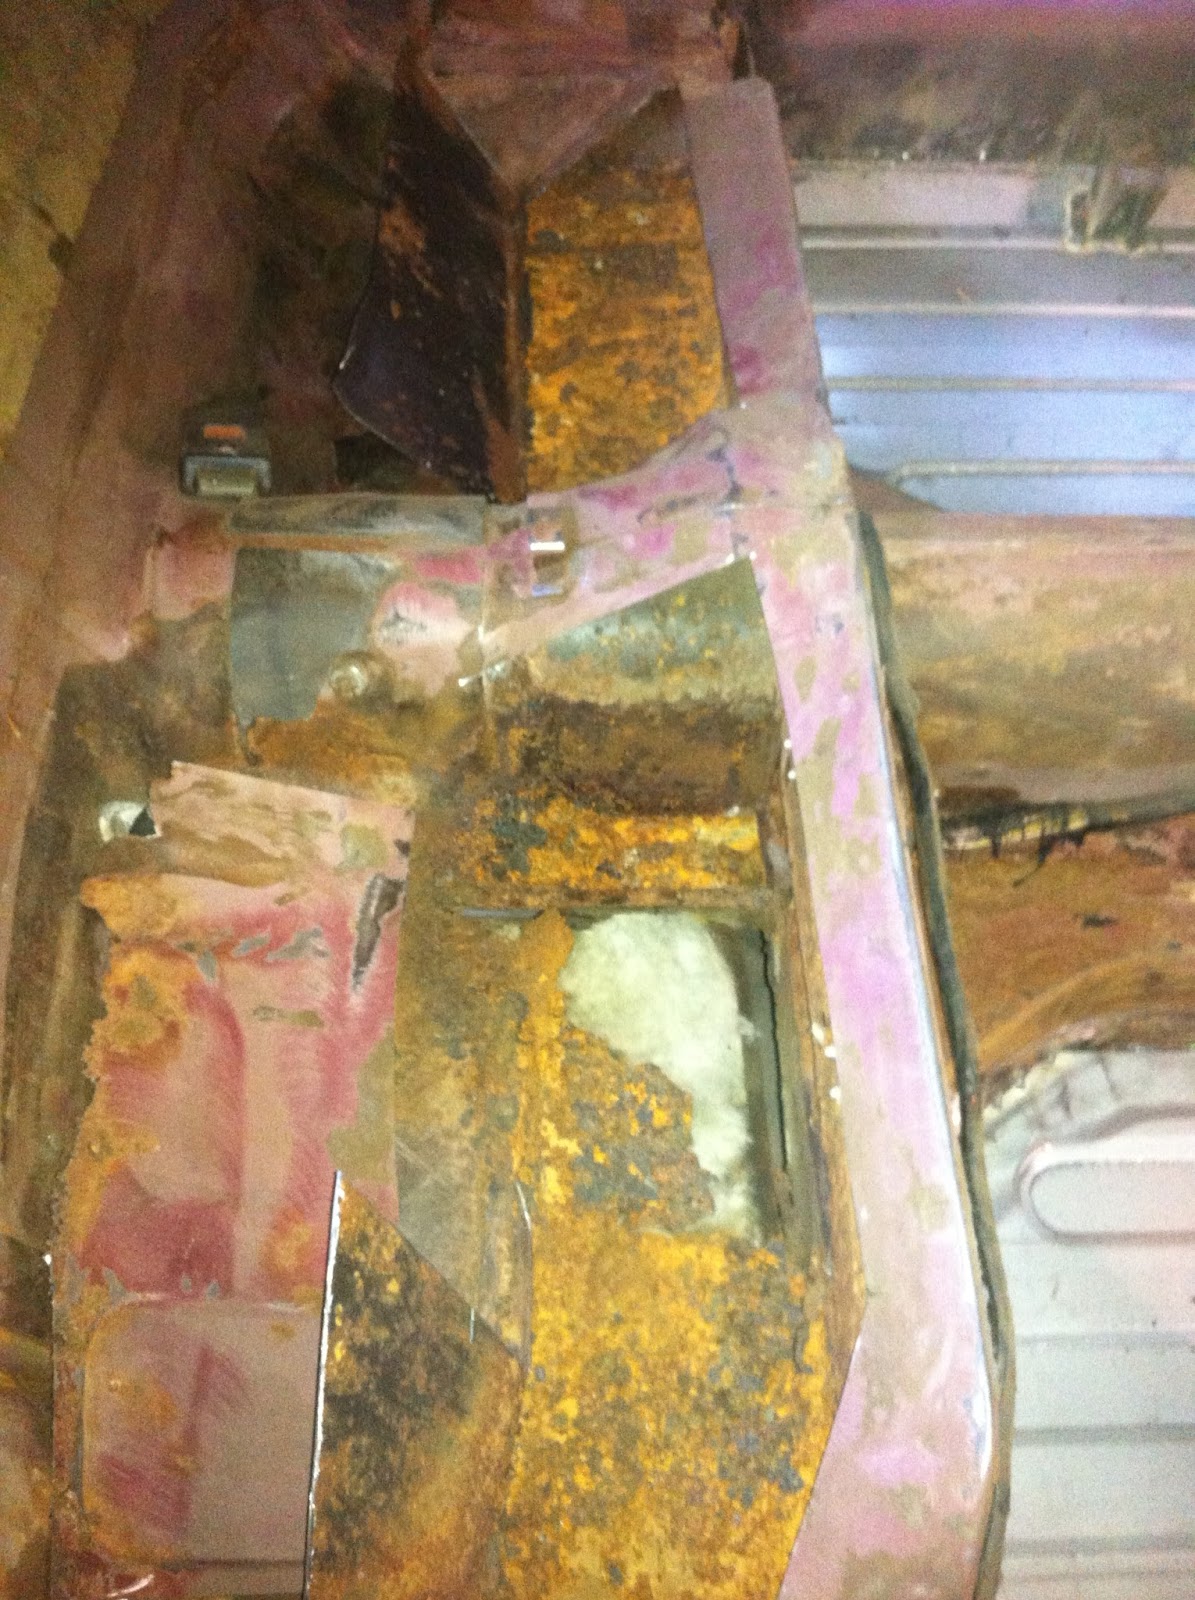
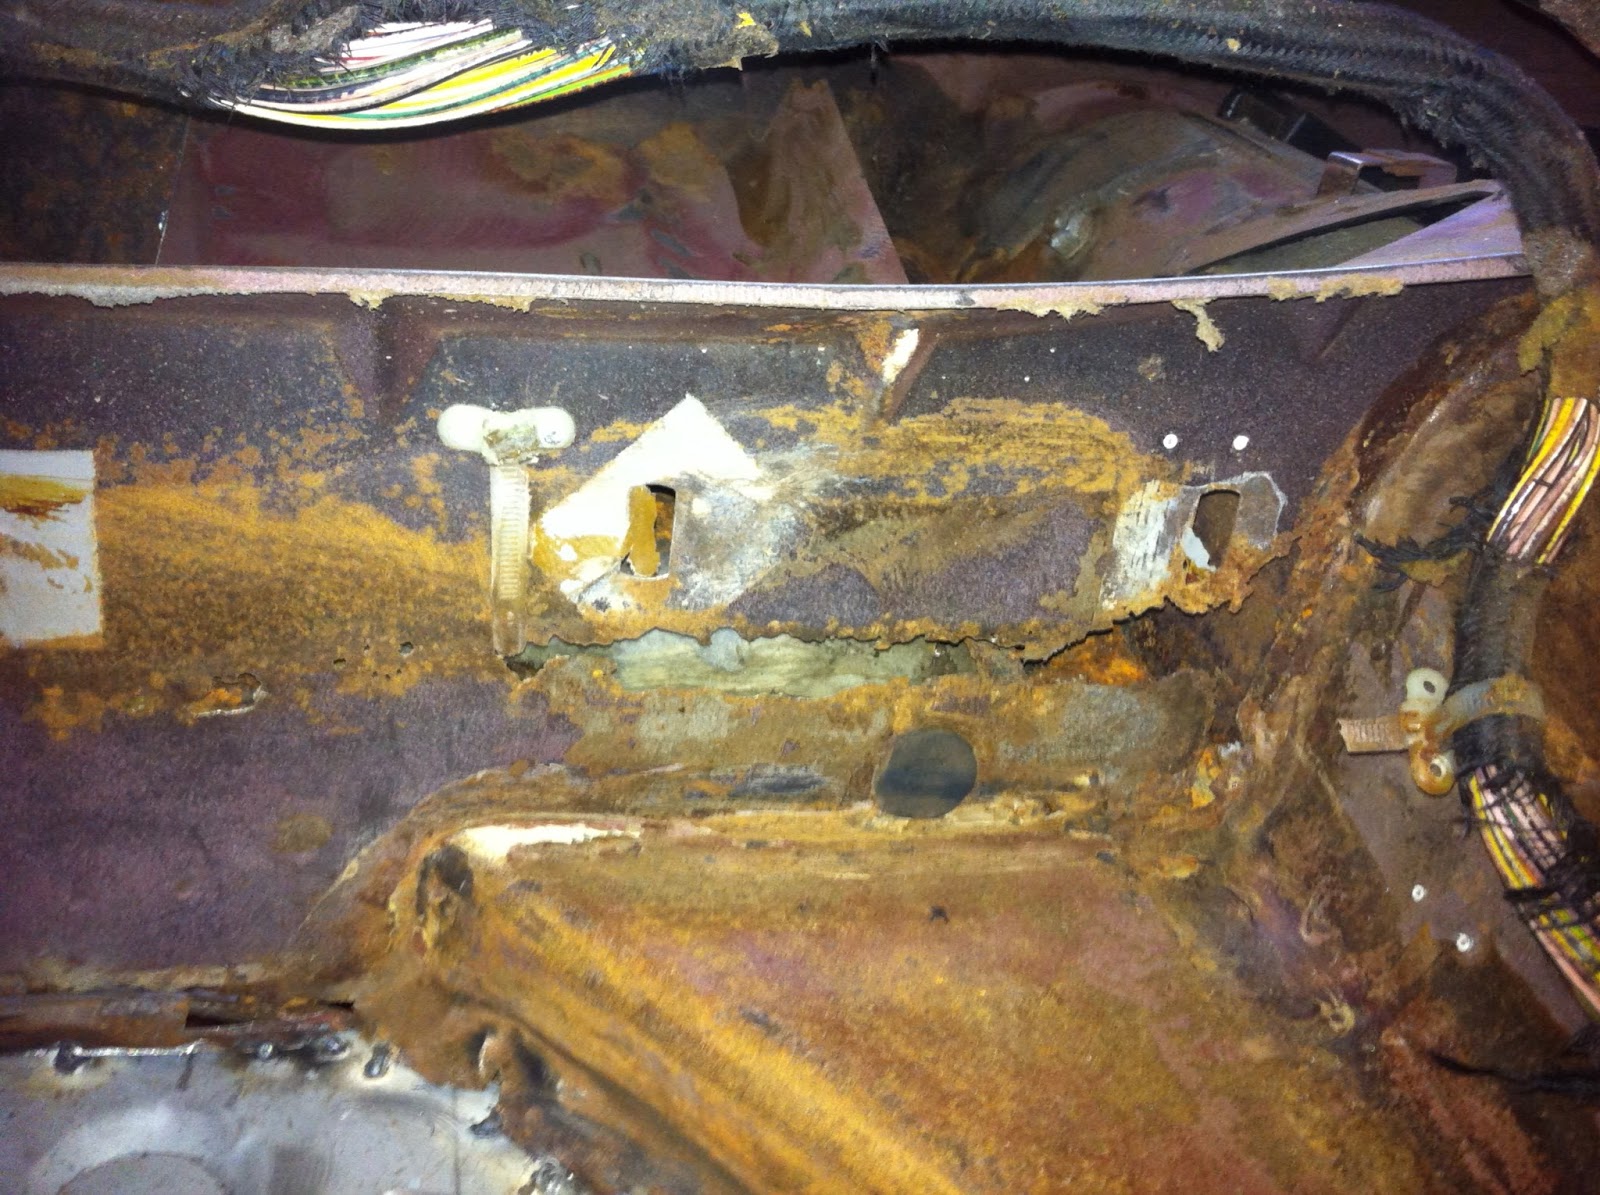
The next step from here is to remove any flaking and poorly attached body deadener, rake out all body seams and prime/seam seal the seams. As I've mentioned before, Jaguar didn't use seam sealer on these cars, which is why so many rust badly.
 Once that is done, I need to repair some rust in the lower quarter panels and look at repairing/ modifying the beaver panel for sedan chrome bumpers (series 1 or 2 bumpers, I am going for a factory prototype look and hate the 5 mph bumpers). I also have to do a final tidy up of the boot floor and get that all straight, much easier as it is at the moment and I can have someone hold a dolly whilst I hammer on the other side.
I also have to run new fluid lines and will grab them from a series 3 sedan donor car when I find one. It'll be a lot easier to run the lines now whilst the car is on it's side. I'd even like to run new exhaust pipes when it's still easy to work on, I'm not sure if I'll go stock XJS dual exhaust or work out another way to get past the rear suspension cage. At the very least, the mid pipes and front mufflers can go in now.

Sunday 16 September 2012

Back from a break

 So I've been "between" full time work for a few months, so XJS work pretty much stopped in an effort to conserve money.
 However, in that time I started making up patch panels for the few major rust repair areas that the new floor pans didn't eradicate. mainly rear parcel shelf, floor under rear seat and the rear seat bulkhead. There are a few other small rust repairs remaining, but they are small coin sized repairs that won't take much effort at all.
 The process I developed for shaping the rust repair panels was largely borrowed from my time as a marine trimmer/sailmaker. I made patterns up out of paper and simply transferred the paper onto sheet steel. The paper allows you to quickly and accurately form the template in situ, ensuring the paper lays flat, and is quick and easy to trim to fit well in position as well.
 Then I used a cheap craft glue to tack down the templates onto my sheet metal and cut them all out with a combination of a 100mm grinder with fine cutting disc and tin snips. The grinder is perfect for doing long, straight cuts.
 Once the panels are cut out, any flanges needed are bent in on the vise and then a trial fit is done to do any further fine shaping. I haven't welded the panels in yet, but they will be offered in place, marked and the rusted panels behind trimmed out before welding into place.
 Here's how I laid out the repair templates. You can see the advantages of this method; it allows efficient use of the materials and allows you to set up and cut multiple panels at the same time, a real time saver. No one said home car restoration had to be slow and painful, lack of specialised tools merely means thinking harder before starting something!

This is the rear seat vertical bulkhead patch trial fitted. The floorpan welds need grinding smooth for  a nice flush fit, but very close. The paper template allows very close fitting straight off the template, only very minor trimming required in corners for a great fit:

This is the floor below the rear seat, where it rusted out due to rear window leakage. The vertical bulkhead will be cut back for the patch panel before this panel is cut back and welded in, then the vertical bulkhead patch panel welded in. This way, I get brand new floor welded to brand new vertical bulkhead, very strong and an easy fit:

  The other side isn't nearly as bad, a much smaller rectangular patch is all that is needed to the floor and the vertical bulkhead has not been affected by rust.
 Only a small strip is needed for where the bulkhead meets the floor:

 Also the passenger side seat box needed a patch:

 I also have the panels cut for the parcel tray but don't seem to have photos of that.
Once the patch panels are welded in, they will be wire brushed to remove the adhesive and paper, then I'll flip the car on it's side and finish weld the floors and rust repair patches from underneath. Then I can do any other underfloor work as needed (, prime and seam sealer to new weld seams, repair existing failing sealer), and chip back any bad bitumen coating, reprime/seal and replace coating.
 By having the dolly frame I made wider than the car, I can strap the shell down to the frame and lift one side with my engine hoist, the frame simply pivots on the floor. This will make work on the floors easy and when time comes to fit fluid lines etc, will also make that job simple. Rotisseries are a trendy fad, totally overpriced and unnecessary! Just think about the problem and devise the simplest solution.

 Got stuck into the car today and cut out the rusted parts plus cleaned up the metal around them for welding. Looks pretty scary, but it is all under control. This is looking down through where the back seat should be, you can see the ground and the large soundproofing/heat pad under the floor. Once I have welded the panels from above, the car will be tilted on it's side, the soundproofing will be removed and the underside finish welded, painted etc. Not sure if I will try and reuse the soundproofing pad or use the modern self adhesive bitumen/aluminium pads:

I've finally gotten some decent work done. Bought some more welding wire (which is far better than the junk CIG sells in it's retail packs. Way less spatter and much easier slag removal), and replaced the microswitch in the handle of my MIG welder. It was not making contact all the time and causing bad welds.
 Anyway, I have the floors under the rear seats welded up and the bulkheads in front of that:


I've brushed some red primer over the repair, not that it really matters, I'll be turning the car on it's side and welding the patch from underneath as well, which will burn some paint off. Plus the top piece will be welded over it and seam sealed properly, so the floor will never see water ever again.
Front seat bulkhead came out well with the new floor patch welded into the back of it.
And I've welded the two corner patches into the parcel tray. Welded top and bottom. Probably stronger than the original panel, but the parcel tray carries the boot hinge loads and the two child restraint anchorage points, so I don't mind it being a bit overbuilt. I found it surprising that a car built in 1977 had child restraint anchorage points, but there they are. Correct thread and position. They are the steel standoff towers that the parcel tray fasteners push in to, so if you ever need to fit child points to your XJS it's easy.:


Thursday 31 May 2012

Footwell fun

Rust repairs are the worst part of any big restoration. They take forever if done properly and it looks like you haven't achieved anything. All you have is a slightly less rusty car. Nothing shiny or cool happens at this stage, and it can be demoralising!
 I've been fairly busy reconstructing the passenger footwell area and it's nearly done. I just need to finish weld some areas and repair the false foowtwell.
 It took me some time to come up with this final shape:

Also had to repair some rust around the forward end of the transmission tunnel, that patch took some time:

As you can see, I pulled the false footwell panel well up and out of the way for access, this was made easier by the fact it had rusted away from the floor at it's base, and the sill damage had also pulled it away.
 I also straightened the inner sill where it had bent in the impact, and cut a new piece to weld over it. This makes it nice and strong, and straight! Now the inner sill and floor are repaired, that whole area is very strong and I can finish the repairs to the outer sill with a good reference point. Panel repairs are all about doing a layer at a time, ensuring things are kept as they were:


I've also managed to find a good used radiator crossmember and weld that in. For some reason, the crossmember in this car had been removed, it looks like for another vehicle. I guess rust is common in these pieces, at least this one is rust free:


Monday 14 May 2012

Floored

The replacement floor panels arrived last week, so I got to work and cut the old floors out. I left the seat boxes in place by drilling out their spot welds and cutting through the floors underneath them. pretty easy work.


There was a small area on the passenger's side seat box that will be replaced, I cut that section out whilst the floor was out, much easier at that time. The section will be replaced after the floor is in.
 Some photos trial fitting the floors. The support frame with casters I made is proving itself invaluable, allowing fast, easy access to all parts of the car. Floors were replaced without having to support or jack up the car at all, just sitting on the frame.
  The floor replacement panels are nicely made, very accurate reproductions and in a galvanised finish. I have to repair a small section at the corner of the driver's side where the rear seat bulkhead drops down, but that side is done apart from that.


The passenger's side needs more work. The front floor around the jack point is very rusty and the impact the sill took also caused some damage, so the jack point and front wheel well bulkhead/floor transition area will be rebuilt. I'm going to delete the jack point, they are ridiculously flimsy, I'll take some photos when I have it all apart to prove my point. Basically, all the jack point consists of is the floor sheet, a double angled bracket inside and the angled filler piece in the footwell. The sill is much stronger in this area and I'll be reinforcing both sills in this area to use as jack points on my car.
 I've also opened up the floor under the rear seat. I knew there was rust in there, but it's pretty easy to fix if it hasn't gone too far, all the panels in this area are either flat or have gentle curves, so it's simply a matter of cutting some well fitting cardboard patterns, transferring it to sheet and welding them in. I'll detail that in the next installment. I'll also attack the small amount of parcel shelf rust shown below as well. Again, a fairly easy repair. Both these areas rust on XJS and S1/2/3 sedans when the rear window leaks. The area below the seat rusts badly because water can get in but not out. All Jaguar had to do is use seam sealer on the floor in this area and provide a water drain hole (and seal the windscreens better!).


Thursday 26 April 2012

Chipping away

I've been getting the annoying, dirty jobs done. Nothing really exciting to see, but will detail progress nonetheless.
The sill is about 95% to how I want it now, it's almost lined up and square. I think I'll cut a front outer skin off another car for this area just to tidy it up and save some time. I could continue to knock it out, but it's quite thick sheet.

 I also managed to get the boot floor straightened out, welded up and that allowed me to remove the fuel tank. Amazing the difference 10mm to the axle hump height made when it came to removing the fuel tank! To remove the tank, you MUST remove the bolt in boot gutter supports. I want to weld these back in when they go in, so I am looking at ways to make the forward supports removable and leaving the angle pieces that run down the boot gutters in place. Also managed to get the crusty old towbar off the car. The boot just needs a good wire brushing and clean up, some seam sealer and it's ready for paint.

I've also removed the side window and C pillar trim/decorative panels. No rust there fortunately. Pretty straightforward removal, although aluminium rivets were used to assemble, meaning the rivets had all but corroded away. There was also a severe lack of sealant around the rivets where they'd been seated, reassembly with Duralac and butyl mastic will eliminate corrosion and any chance of leakage.

 And I'm still waiting on the replacement floor panels. I've got a supplier lined up in Melbourne, but communicating with them is like using carrier pigeons. I'll never understand businesses who want to use websites or Ebay to sell products, yet don't respond to electronic communications!
 You can see the floors here, they would make quite good colanders. One of the only issues I have with Jaguar's assembly and materials selection is the way the soundproofing on the floors was done.
 I'm also pretty sure I need to replace the front torque box/jack support under the front floor on the damaged side, it just looks ratty, so I'll appropriate a part off the future parts car for this as well.
 Here are the holy floors.


Monday 16 April 2012

Porta POWER!

This is a Porta power:

It's a hand powered hydraulic ram. The large cylinder with the hand pump is just a reservoir, the other cylinder is a 10 ton ram. The kit comes with a whole bunch of odd shaped attachments and extensions to allow precise positioning of the ram against the affected area.
Here's how you use it:

Set the ram up against the damaged area, ensuring the other end of the ram is up against a strong part of the body. I used the rear box section at the boot, with a large piece of steel to spread the load. I also kept the ram low down towards the boot floor, so the boot floor would take the load in shear and reduce rear bulkhead distortion. What you are trying to do is set the ram up so it pushes in the opposite direction of the force that caused the crease. You don't want to merely force the bumps down, but move the whole area back into position.
 What you do then, is pump a little until the creases start to disappear. You don't want to go too far in one spot or you'll do further damage. You know the creases have gone as far as they will go when they stop flattening out. Then you move on to the next area. With these creases in the bulkhead, I moved left and right with the ram, keeping the flat end of the ram down against the existing body crease. As I worked it back and forth, the creases slowly decreased.
Once you get to a stage where pushing the ram starts moving the whole panel, then start slowly dressing down the high crease spots with a hammer, whilst load is still applied. I also use a piece of bar stock to hammer down onto existing body creases, to help redefine the panel shapes and build the stiffening back in that the creases provide to the panels.
This is as far as I can go with the Porta power and hammer, this stage, with the Porta power and coarse hammering is known as "roughing out". I will progress to a hammer and dolly once I get my propane torch back to help settle the creases down. I also need to weld a couple of body seams back up, it's common for the Porta power to pop spotwelds here and there, so I can't get the final shape till I weld all the seams back up.
Even at this stage you can see a big difference!

 Now I've got my eye back in with this simple repair, I'll tackle the quarter panel tomorrow and maybe start on the sill, that's going to be the tricky one!

Obtaining an engine.

 I hadn't planned to buy an engine so soon, but one came up VERY cheap locally. I thought about it a few days and decided to buy it.

 The engine is a Holden 5 litre V8. As you can see, I got it with all front accessories, ECU, wiring harness and transmission.

I had to do a trial fit, to make sure it would fit. I was worried about how wide the front accessories sat, particularly the alternator and power steering pump. But my worries were unfounded. Even with the engine sitting way too low and tilted too far tail down, there is plenty of front room and plenty of exhaust room.


 Even the bonnet clearance looks like it will be fine.


The transmission is a TH700R4 4 speed auto and is a pre computer controlled version, so all I need to hook up is a switch for torque converter lockup. The Holden V8 is multi point injected and makes about 50 ft/lbs more torque than the V12, despite being smaller in displacement.
 The Holden it came out of had a 3.08 diff ratio, the XJS will be 3.55. So I am assuming that with the much shorter first gear in the 4 speed auto, shorter diff ratios and more torque, it should be a good match and will likely be faster than a V12 powered car, and get much better economy with the overdriven top gear. The new engine and transmission is also around 100kg lighter than the old combination.
 Plus I won't have to look at the temperature gauge every two minutes as if it were a V12!
 Jaguar used GM automatic transmissions in the V12 cars (Turbo 400) and I'm reliably informed that the shifter will bolt right up to the transmission and converting the electronic speedometer drive on the transmission will be as simple as using factory GM parts as well. Even the tailshaft yoke should slide right in. Tailshaft will probably not be the correct length though.
 The plan is to do all the body repairs and keep an eye out for a cheap donor car for suspension crossmembers etc. Then when I have the rear and front crossmembers, I can fit the engine in, make up engine mounts, wire the engine up and ensure it will all work. Then I will remove everything again, paint the body and engine bay and refit it all. This will hopefully minimise the amount of damage to the body fitting the engine may cause.
 Once the engine is finally back in I will tidy up all the wiring in the car, including engine swap and ensure it all works before I work on the interior. This will allow me full access to behind the dash and to run any wiring I need.
 By using the original Holden wiring harness and ECU, I can take advantage of a few things. The Holden ECU will trigger electric fans, it will engage the air conditioning clutch (and automatically provide idle up at the same time) and also has an immobiliser signal terminal, so I can wire up a simple aftermarket remote door lock kit and automatically immobilise the car at the same time. By using the Holden ECU for air conditioning, I can also bypass the sometimes troublesome Jaguar airconditioning unit, all I need is for the Jaguar aircon switch to signal the Holden ECU when it wants the compressor to run.
 The best part about the Holden ECU wiring is that it's complete. All it needs from the Jaguar is a few ground points and a couple of constant 12v and switched 12v inputs.

Setting up for the project.

I had decided before I even bought the car to run some sort of V8 engine. If you're a Jaguar purist, you'll go into your usual rant about how it's not a Jaguar anymore, I don't care. I specifically bought a shell that needed work and with no engine so I could fit a V8. Let's face it, it's unlikely anyone else would take this car on, so I've left one "pure" V12 powered car out there for someone else to spend countless dollars on that cranky V12 and wonder how a 5.3 litre engine can be so gutless. Seriously, 285 ft/lbs of torque out of a 5.3 litre engine? I know many sixes under four litres that crank that out.....
 To be honest, I think the XK engine is a far, far better engine and so is the AJ6. You have to wonder about the legendary V12, the 4 litre AJ6 engine can be within a half second of the V12 in acceleration figures....
 Anyway, spare me the lectures. I'll build a car with an engine that's more powerful, more reliable, cheaper to run and service and generally more enjoyable to drive.
 So here we are. I have stripped the shell and found the main problem areas. Both floors need replacing. I'm not at all worried about that as reproduction floor panels are cheap and readily available, as are genuine Jaguar parts for very reasonable prices.
 There is some minor rust low down in the quarter panels behind the wheels. Again, an easy fix.
 The rear parcel shelf is also a bit rusty due to a leaking rear windscreen, and so is the floor under the rear seat cushion. They are both easy repairs as well. The XJS has no rust around front or rear windscreens, no rust in the sills or the A pillars, so it's an excellent shell in that respect, and that alone makes this shell worth restoring!
 The big issues are the bot floor and the left hand front sill. The bozo I bough the car off dragged it around the paddock on it's floor and hit a few rocks etc. So I need to push these pieces out. They look bad, but the process is pretty straightforward.  I have the skills, my time is free and I know it will be worth it to have a nice, rust free strong shell.
 Here is the front of the sill I need to repair:


 As you can see, the rest of the shell is amazingly rust free, even up around the cowl where the front guard overlaps. They often rust up there.

 Here is the boot floor. Notice the crease in the left floor and bulkhead. This has also creased the floor under the fuel tank, so I can't remove the tank until I pop this crease back out. bashing on it with a mallet is NOT what you should do here, you need a Porta power. I will detail how to do that later when I get around to it.

Here's a photo inside the cabin, showing the floors. Yes, those bright white spots are holes! Jaguar used  a medium density foam with a bitumen layer over it under the floor on these cars to suppress sound, it worked well. Unfortunately it holds moisture and never dries out once wet. So you get the classic Jaguar floor pan rust.

 Jaguar also used foam backed aluminium sheet sound and heat insulation in the engine bay (thanks to that V12 creating a volcanic amount of heat, due to it's "efficiency"). It causes rust underneath wherever it touches metal, as can be seen on the angle running down from the firewall to the chassis rail. This rust isn't bad, it'll clean up as is.

I also made a cradle on casters so I could move the shell around in the garage and not have it getting in my way. This allows me to push it across out of the way when not working on it, drag it to the middle of the garage for plenty of working room and probably most importantly, allows me to easily clean up underneath after making a mess.

The beginning

 As with any cheap car, this one needed work. This work started when I went to pick the car up. I was promised there would be several people to help load the shell onto a trailer. When I got there, it was me and the owner. Two and three quarter hours of sweating, grunting and swearing later, the shell was finally persuaded onto the trailer and I got out of there!
 I should've taken some photos of the car's location, it was on a hill, covered in grass. I had to back the car trailer up to the front of it, but couldn't get any traction, so I ended up hand winching the trailer up the hill to the car. I very nearly walked away from it at this point!
 Here is the shell on it's way home behind my trusty old 740 Turbo:

 And here are some photos of the car after it was dragged, kicking and screaming, into the garage! That was fun too, lifted one end with the engine hoist and the other with my floor jack. Unfortunately my driveway is not a one piece slab, it's many smaller pieces that have been added over the years. So I'd get a few feet, have to stop, realign wheels etc. Hard work!
Here's the XJS, sitting pretty much just inside the door. I'd had enough by this stage!

 After I had the car in the garage (and let it sit a few days, I was buggered after moving the shell around!), I stripped out all the junk that the owner had thoughtfully dumped in the car (two wheelie bin's worth) and stripped all moving panels, wiring, bumpers etc that would be in the way of further work.
 It may not look like much, but all the important stuff is there. Wiring harness, fluid lines, dashboard etc. The rest can be easily obtained from sedans or another XJS.