I spent some time stripping the last of the useful parts from the parts car a few days ago. I now have spare blower fan assemblies and a complete Delanair climate system. Interestingly, I found what appears to be an aftermarket amplifier for the Delanair system, it's in a plastic cylinder and plugs into the factory original plugs.
So, the interior is almost complete. The door trims haven't been started yet as I need new door cards. I have seen them new somewhere, but can't find them right now. They can wait, still plenty to do.
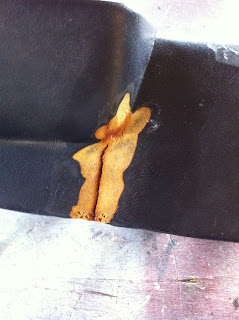
I am lucky enough to have two complete dashboard assemblies to choose from to restore, the one that came with the car is in very poor shape, it's seen a lot of direct sun exposure from sitting in a paddock with no windscreen to filter the UV light.
The parts car one was much nicer, but still had some splits here and there. You can see how much worse off the original is compared to the parts car one, original to rear:

After studying the dash for a good, long time, I thought it might just be possible to have a go at a reskin.
The factory uses an unbacked vinyl and vacuum forms the vinyl onto the frame and foam, but most of the curves seemed gentle enough that I could get away with it.
The first step was to remove any vinyl that was delaminated, clean up rough corners then fair and fill the cracks. I faired the cracks with a flap wheel disc, then filled with urethane adhesive. The urethane works well, it stays flexible, is a super strong adhesive and it can be applied and sanded fair like any body filler. It just needs absolute cleanliness to work. Dug out cracks and faired with flap wheel:

And then applying urethane and sanding. The urethane is very easy to apply being single stage, and comes in a caulking cartridge, so easy to force into the crevices:

 And the finished product:


The scary part was working out how to skin the dash. You don't want to stretch the vinyl more than you have to. The more you stretch now, the more it will inevitably shrink as it ages.
Of course, you have no choice in certain areas, but they are generally areas that are convex curves, so if they shrink, they only pull tighter.
Don't even attempt this unless you have a way of spraying proper industrial contact adhesive, you need good, thick coverage and the adhesive needs to soak into the vinyl backing scrim for a proper bond. There's no glue in a can that will last and brushing it on is too inconsistent. I sanded the existing vinyl down heavily with 240 grit on a detail sander, ideally you want as much oxidised vinyl removed as possible. Then wipe down several times with a quality wax and grease remover. We are relying completely on the contact adhesive bond, we want it as strong as possible!

Keep working it, slowly, no rush. A bit at a time. It's OK to stop and have another go! I did, several times. Stick a bit down, glue some more, heat with gun, stretch and glue. And so on:


I would say the job was pretty successful, although there was a solid six hours all up in it. I'd give it 90%, next time would be much easier!
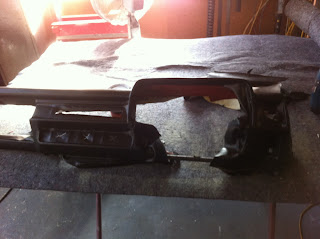
Here I am trial fitting the defroster fill piece and windscreen rubber, defroster piece needs some shimming and tweaking to fit better. Notice some slight bubbling around the tight corner where the gauge binnacle meets the flat part of the dash. This should bubble evenly around this corner as everything settles and look much smoother. If I was to do it again, I'd fill this corner to a bit of a radius using the urethane. I thought about putting a seam in the vinyl here, but then I would've needed to skin the dash with foam and that wouldn't have allowed near as good adhesion of the vinyl:
 Aftermarket screen rubber looks like it will work nicely too, and most importantly, meets up with the interior trim neatly everywhere as well:

Whilst the dash was apart, I mix & matched the two switch panels I had to make the nicest one I could with parts. I scored a NOS Hazard lamp switch some time ago and will replace the others as they come up for sale. Meantime, they all got disassembled, cleaned and regreased. I really should've found some silver paint and run new borders around the switches, but I do intend to buy new ones and my hands weren't feeling very steady on the day:


I also scored an NOS filler flap seal off Ebay. Unfortunately, there was some slight aging from it being stored in a PVC bag (some rubbers seem to react with PVC long term), but it cleaned up nicely and the surface stickiness has gone. It really finishes the fuel filler surround nicely and prevents the filler flap damaging the paint:


No photos, but I've pulled the Cibie headlights apart to see what needs to be done. The lens had already separated off one, so I knew the reflectors were in bad shape, but the rest is in very good condition, no corrosion. The plastic diffuser inserts are very yellowed though, I'd like to scrounge up some new ones if I can, or I may try my hand at making a mould and finding a suitable resin to cast them in. There are some super clear acrylics out there for encapsulating things, but I'm not sure of their UV resistance.
I kicked about a few ideas on how to restore them, including inserting later model lamps, but it's going to be cheaper and much easier to get the reflectors replated. I have a lead on a company that can do the vacuum metallizing process for a reasonable price and they also plate plastic. So I will get the headlights stripped and cleaned and send them off with the tail lamp bezel/bodies for replating when I can allocate funds for that.
The last big looming job to do is to work out how to refinish the urethane or rubber bumpers. The surface is too sun damaged for a simple sand and buff, I may end up having to apply another layer of urethane somehow. I'm considering spray on bedliners, urethane adhesive like I used on the dash etc, but the real trick will be finding something slow curing and with the right flow characteristics to make the job garage friendly.
The list of really big jobs is just about finished, now there's lots of smaller tidy up and finishing off jobs to be done. In my experience, this is where things can bog down if you let them!
So, the interior is almost complete. The door trims haven't been started yet as I need new door cards. I have seen them new somewhere, but can't find them right now. They can wait, still plenty to do.
I am lucky enough to have two complete dashboard assemblies to choose from to restore, the one that came with the car is in very poor shape, it's seen a lot of direct sun exposure from sitting in a paddock with no windscreen to filter the UV light.
The parts car one was much nicer, but still had some splits here and there. You can see how much worse off the original is compared to the parts car one, original to rear:

The factory uses an unbacked vinyl and vacuum forms the vinyl onto the frame and foam, but most of the curves seemed gentle enough that I could get away with it.
The first step was to remove any vinyl that was delaminated, clean up rough corners then fair and fill the cracks. I faired the cracks with a flap wheel disc, then filled with urethane adhesive. The urethane works well, it stays flexible, is a super strong adhesive and it can be applied and sanded fair like any body filler. It just needs absolute cleanliness to work. Dug out cracks and faired with flap wheel:


Of course, you have no choice in certain areas, but they are generally areas that are convex curves, so if they shrink, they only pull tighter.
Don't even attempt this unless you have a way of spraying proper industrial contact adhesive, you need good, thick coverage and the adhesive needs to soak into the vinyl backing scrim for a proper bond. There's no glue in a can that will last and brushing it on is too inconsistent. I sanded the existing vinyl down heavily with 240 grit on a detail sander, ideally you want as much oxidised vinyl removed as possible. Then wipe down several times with a quality wax and grease remover. We are relying completely on the contact adhesive bond, we want it as strong as possible!
So, here's as good a place as any to start, lay the top down, then fold back, spray some more adhesive on and slowly work your way down. You WILL need a heat gun to do this:


I would say the job was pretty successful, although there was a solid six hours all up in it. I'd give it 90%, next time would be much easier!
Here I am trial fitting the defroster fill piece and windscreen rubber, defroster piece needs some shimming and tweaking to fit better. Notice some slight bubbling around the tight corner where the gauge binnacle meets the flat part of the dash. This should bubble evenly around this corner as everything settles and look much smoother. If I was to do it again, I'd fill this corner to a bit of a radius using the urethane. I thought about putting a seam in the vinyl here, but then I would've needed to skin the dash with foam and that wouldn't have allowed near as good adhesion of the vinyl:


I kicked about a few ideas on how to restore them, including inserting later model lamps, but it's going to be cheaper and much easier to get the reflectors replated. I have a lead on a company that can do the vacuum metallizing process for a reasonable price and they also plate plastic. So I will get the headlights stripped and cleaned and send them off with the tail lamp bezel/bodies for replating when I can allocate funds for that.
The last big looming job to do is to work out how to refinish the urethane or rubber bumpers. The surface is too sun damaged for a simple sand and buff, I may end up having to apply another layer of urethane somehow. I'm considering spray on bedliners, urethane adhesive like I used on the dash etc, but the real trick will be finding something slow curing and with the right flow characteristics to make the job garage friendly.
The list of really big jobs is just about finished, now there's lots of smaller tidy up and finishing off jobs to be done. In my experience, this is where things can bog down if you let them!


