Sunday, 28 February 2016

Take a seat.

 But first, in the my god, does it never end/ cascading jobs needed before doing something else department, I wanted to install the door glass.
 To do that, I needed to install the door quarter vent glass (previous post) and re run the door wiring. Now, the door wiring boots for the XJS are no longer available new and the old ones disintegrate as soon as you look at them funny. I've also been leaving the front guards off so I could sort out the wiring.You can see how one small job can hold up work over a large area on a project!
 So I made some new cable boots using generic, cut to size boots, split tubing and heat shrink tube. They turned out way better and less cobbled together than I expected:


 Once that was done, it was back onto the interior. I got the headlining and pillar trims sorted out easily enough. Again, this colour of headlining is just not available in Australia, it was one of the materials I ordered from the US:


Then, onto the seats. I foamed up the rear seat base and back, this helps smooth out old seats and hides all those small imperfections old foam accumulates over time. If you look closely, you can see that jaguar was still using coconut fibre as a padding material in 1977:


Then it was onto the marking up and cutting out:

Trial fit:


Rear seats finished. With this type of material, having a foam backing, it's normal to initially have a few stubborn creases that won't pull out. They disappear over time as the foam relaxes and the material finds it's own levels:


 The quarter panel trims on an XJS, they are a nightmare! So many sub assemblies and small parts. No wonder Jaguar couldn't make money on these cars, way too labour intensive to produce
 All these pieces:


To make this (yes, my parts car had a dark green exterior and a dark brown interior. The 70's were unkind to vehicle interiors...):


 I added some cedar I had laying around to the pockets because they had gotten wet and warped, plus I wanted to fit speakers and wanted them a bit stiffer:


 Needless to say, as with every other piece of interior trim in a 40 year old XJS, the quarter trim casings were cracked, torn and damaged. They needed some help with realignment and some fibreglass:


The quarter panel cases are covered with one piece of material, it's a long, tedious process getting it stretched into place and looking right! Each side would have a solid four hours in it:

 I'm still working on the interior, the door trims are disassembled and being flattened out, more pics and an explanation in the next installment!


More exterior bits and pieces.

 It was time to really get the interior moving. My materials arrived from the US (Australia has a very limited selection of upholstery supplies, that is, if you don't want to choose from the same half dozen colours that everyone else has in their car), and I wanted something quite specific.
 All the carpet has been cut and the tunnel and sills have had their carpet glued in place. The floor mats need a final trim then I'll bind them. I really like the carpet, the colour suits the era of the car:

 It was also time to close up the C pillar covers and fresh air vents. My fresh air vents had cracked and split, just like every other XJS out there, and were definitely leaking water. These pieces really contribute to rust on the XJS, as the water runs directly into the boot, quarter panel and rear jack point when they leak.
A local supplier had one listed as an XJS quarter panel vent on Ebay, but inexplicably, had the other side listed as a really vaguely titled auction on Ebay, just listing the part number, which was hard to track down.
 Long story short, I now had two brand new C pillar vents for under $50:


 Now, the pillar vent issues don't end with them being old and cracking. I have now removed four of these vents off two cars and not one of them was sealed to the body properly. Another huge problem is that the vents are made of several pieces, and where these pieces join at the bottom, there is a gap. A gap right where any water trapped by these vents runs past!
 I can guarantee that if your C pillar trims are original and have never been removed, they are leaking....I made sure my ones were well sealed with butyl mastic.
 A long while ago, I scored a NOS C pillar trim on Ebay dirt cheap. I could never find a new left hand one, so I decided to restore my old one. Then I realised it wouldn't be much more work to do all four, so did them all. I'll sell off the extras.

They've all been stripped, cleaned and the die cast covers in the centre painted with 2k urethane. The vinyl is the closest match I could come up with, but they look great:


  Before I put the rear glass into the car, I wanted to make my new parcel tray (the old one was soggy and disintegrated), plus I wanted to add a high mount brake light from a later XJS.
 Modern drivers are very distracted, everyone expects to see high mount third brake lights on cars and high mount brake lights are just a great safety device.
 So I decided to mount the brake light onto a piece of wood I fashioned up:


 It was time to dig out the glass and tint it, in preparation for installation:


 Rear window installed, so I can work on the rear of the interior:

 The door quarter windows were then fitted, as I needed them done so I could fit the bailey channel for the door glass;


Last of the painting!

With all the major work in the engine bay completed, it was time to paint and fit the bonnet, plus paint the lower splash panels.
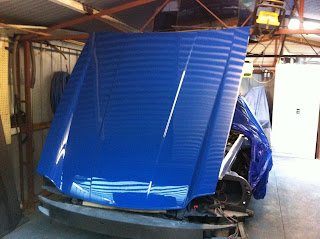
 A trial fit confirmed all my careful work kept the engine under the bonnet line (only just!) so it was out with the heat gun, sharp scraper and elbow grease:

 The heat gun makes easy work of the old body deadener. As you can see, Jaguar put the deadener directly over bare metal, works well enough, but doesn't stop corrosion long term...
 Then it was onto the wire wheel and sander. I had to remove the rear longitudinal strut under the bonnet for intake manifold clearance, it was JUST touching when pushing down on the bonnet:

 A couple of coats of epoxy primer, then bond the bonnet frame to the skin as Jaguar should've done, for added strength and stability:

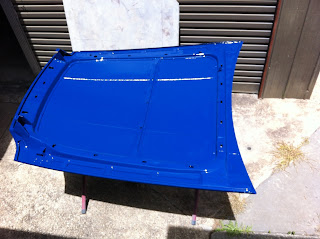
Topcoat underside of bonnet:


Then it was on to stripping the paint off the outside of the bonnet. I love chemical stripper, so easy, clean and dust free, especially when dealing with lots of old paint:

 Filling and fairing the bonnet. The XJS bonnet seems to be a fairly poor stamping, lots of shallow waves and not too crisp lines:


 Epoxy primer, high fill primer:


 And topcoat. To say I am pleased with the finish would be an understatement!


 Whilst I was painting the bonnet, I also dug out the boot plinth and restored, prepared and painted it and all it's bits and pieces. Surprisingly large amount of work in it too, but it does look spectacular!


 And in preparation for installing window glass and interior pieces, I painted the door glass frames whilst I was in the mood to paint: