Wednesday, 15 May 2013
Friday, 10 May 2013
Turning a corner
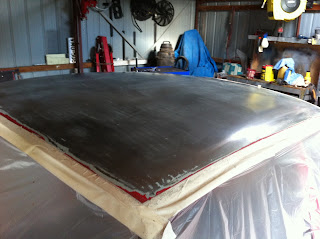
I stripped most of the paint off the shell over the last few weeks. Roof and quarter panels were chemically stripped.
Also note that I've filled the buttress panels from firewall to chassis rails. The original V12 heat shields had held water on this area and destroyed the paint coating, causing heavy surface rust and pitting.A good clean up with a wire wheel and a skim of filler has made them look great. The top flat panels aren't really structural, they merely serve to fill the gap between inner guards and the stamped diagonal brace that runs along their inner edges from frame rail to firewall. They probably have some very minor bracing effect for this brace, but it wouldn't be much.
All the welding and rust repairs are now done on the shell, so it's fill and fair time.
Anyone who has done this job knows how slow and tedious it is, filling, sanding, filling some more. Every area of filler gets several thin applications, slowly building the low areas and sanding down any excess. It's fair to say half the filler or more ends up on the floor as dust, but that's how you get a truly smooth profile.
I was under no illusion that the car would need filler, I knew it had been given a new driver's side quarter panel at some stage and the passenger side rear quarter was a bit wobbly. Even so, there is not a huge depth of filler on the car, just a thin skim over most of it.
I like to apply a coat or two of filler, sand them back and let them sit for a week to outgas and properly cure before skinning on more coats, I think this step with every consecutive stage of the bodywork process helps adhesion between the layers and drastically reduces any future tendencies to shrinkage in either filler or primer coats.
A quick word on fillers compared to lead wiping of body shells. The factory always used lead for two reasons: it was fast and easy to apply and easy to work in a hurry. It was used purely for these two reasons, not because it's better. Modern fillers are far, far superior and enthusiasts don't have the time constraints the factory had to get body shells down the production line in a certain period.
With lead, the factory could have one or two guys on the line filling the A and C pillar butts where they met the roof, then another guy or two could body file the lead down. No sanding, no dust, a quick and easy two step process that didn't need anything special out of the primers, just a quick undercoat then on to colour.
I had some good luck last week, a donor XJS came up for sale close enough to me to make it worthwhile buying, and the price was too good to pass up. The shell is fairly rusty and has been a victim of a previous fairly average V8 swap, so I'm not too upset about stripping it. It also has everything I need to finish my car.
It was a fun trip to pick the car up. I only really had my Maxima available to do the job. Some calculations concluded an XJS without engine or transmission and fluids should be around 1200kgs and a trailer around 750kgs. So with the trailer only double the limit recommended by Nissan, off I went!
But seriously, I knew the whole trip would be highway driving and was prepared to cruise back at 80 km/h. I found that the Maxima would maintain 100 km/h on the flat easily enough and the suspension, handling and braking were acceptable with the trailer correctly loaded. No, I wouldn't do it regularly, but as a one off it was acceptable!
As you can see, the donor, apart from an ugly bonnet scoop and the V8 swap, is very original, even down to a pretty decent set of Kents. I think it's also a very early body shell, I haven't looked closely at the numbers, but it's in the low four digits.
This will help the bank balance!
Subscribe to:
Comments (Atom)


